우분투 18.04 LTS에서 20.04 LTS로 업그레이드하기
우분투 18.04 Bionic Beaver에서 20.04 Focal Fossa로 업그레이드하는 방법입니다.
16.04에서 18.04로의 업그레이드는 이 글을 참고해 주세요.
업그레이드 과정에서 부팅 불가 등의 문제가 발생할 수 있으니 위험을 인지하신 후에 진행하셔야 합니다.
패키지 업데이트
패키지를 최신 버전으로 업데이트합니다.
$ sudo apt update && sudo apt upgrade && sudo apt dist-upgrade업데이트 완료 후 재부팅합니다.
$ sudo reboot now더 이상 필요하지 않은 패키지를 삭제합니다.
$ sudo apt autoremove && sudo apt clean업데이트 매니저 설치
update-manager-core가 설치되지 않은 경우 설치합니다.
$ sudo apt install update-manager-corelts 릴리스로 업데이트 하기 위해 update-manager의 설정을 변경합니다.
$ sudo nano /etc/update-manager/release-upgrades아래 내용과 같이 Prompt=lts로 변경합니다.
 Default behavior for the release upgrader.

[DEFAULT]
# Default prompting behavior, valid options:
#
#  never  - Never check for, or allow upgrading to, a new release.
#  normal - Check to see if a new release is available.  If more than one new
#           release is found, the release upgrader will attempt to upgrade to
#           the supported release that immediately succeeds the
#           currently-running release.
#  lts    - Check to see if a new LTS release is available.  The upgrader
#           will attempt to upgrade to the first LTS release available after
#           the currently-running one.  Note that if this option is used and
#           the currently-running release is not itself an LTS release the
#           upgrader will assume prompt was meant to be normal.
Prompt=lts
Ctrl+X – Y – Enter 하여 저장합니다.
우분투 릴리스 업그레이드
업그레이드를 진행합니다.
아직 20.04로의 직접 업그레이드를 이용할 수 없으므로 -d 옵션을 사용합니다. (2020-07-29)
$ sudo do-release-upgrade -d$ sudo do-release-upgrade -d
Checking for a new Ubuntu release
Get:1 Upgrade tool signature [1554 B]
Get:2 Upgrade tool [1333 kB]
Fetched 1334 kB in 6s (203 kB/s)
authenticate 'focal.tar.gz' against 'focal.tar.gz.gpg'
extracting 'focal.tar.gz'
Reading cache
Checking package manager
Continue running under SSH?
This session appears to be running under ssh. It is not recommended
to perform a upgrade over ssh currently because in case of failure it
is harder to recover.
If you continue, an additional ssh daemon will be started at port
'1022'.
Do you want to continue?
Continue [yN]SSH를 통한 업그레이드를 권장하지 않는다는 메시지가 표시됩니다.
업그레이드 후 문제가 생길 경우 복구가 어렵기 때문입니다.
그대로 진행할 시 추가 SSH 데몬이 1022번 포트에서 실행될 것이라고 알려줍니다.y를 입력하여 확인합니다.
Continue [yN] y

Starting additional sshd

To make recovery in case of failure easier, an additional sshd will
be started on port '1022'. If anything goes wrong with the running
ssh you can still connect to the additional one.
If you run a firewall, you may need to temporarily open this port. As
this is potentially dangerous it's not done automatically. You can
open the port with e.g.:
'iptables -I INPUT -p tcp --dport 1022 -j ACCEPT'

To continue please press [ENTER]
방화벽 설정 업데이트 가이드입니다.
업그레이드 이후 문제가 발생할 경우 1022번 포트로 SSH 연결이 가능하다는 메시지입니다.Enter를 입력하여 확인합니다.
To continue please press [ENTER]

Reading package lists... Done
Building dependency tree
Reading state information... Done
Hit http://ap-northeast-2.ec2.archive.ubuntu.com/ubuntu bionic InRelease
Get:1 http://ap-northeast-2.ec2.archive.ubuntu.com/ubuntu bionic-updates InRelease [88.7 kB]
Get:2 http://ap-northeast-2.ec2.archive.ubuntu.com/ubuntu bionic-backports InRelease [74.6 kB]
Get:3 http://security.ubuntu.com/ubuntu bionic-security InRelease [88.7 kB]
Hit http://ppa.launchpad.net/wireguard/wireguard/ubuntu bionic InRelease
Fetched 252 kB in 0s (0 B/s)
Reading package lists... Done
Building dependency tree
Reading state information... Done

Updating repository information

Third party sources disabled

Some third party entries in your sources.list were disabled. You can
re-enable them after the upgrade with the 'software-properties' tool
or your package manager.

To continue please press [ENTER]sources.list에 추가된 서드파티 저장소가 비활성화된다는 메시지입니다.Enter를 입력하여 확인합니다.
.......

Do you want to start the upgrade?

18 installed packages are no longer supported by Canonical. You can
still get support from the community.

14 packages are going to be removed. 172 new packages are going to be
installed. 651 packages are going to be upgraded.

You have to download a total of 407 M. This download will take about
51 minutes with a 1Mbit DSL connection and about 15 hours with a 56k
modem.

Fetching and installing the upgrade can take several hours. Once the
download has finished, the process cannot be canceled.

 Continue [yN]  Details [d]
업그레이드 내용을 확인한 뒤 y를 입력하여 진행합니다.
 Continue [yN]  Details [d]y

.......
LXD 시스템 컨테이너 매니저의 설정 페이지입니다.
LTS 릴리스인 4.0을 선택하였습니다. (Enter)
.......

Configuration file '/etc/sysctl.conf'
 ==> Modified (by you or by a script) since installation.
 ==> Package distributor has shipped an updated version.
   What would you like to do about it ?  Your options are:
    Y or I  : install the package maintainer's version
    N or O  : keep your currently-installed version
      D     : show the differences between the versions
      Z     : start a shell to examine the situation
 The default action is to keep your current version.
*** sysctl.conf (Y/I/N/O/D/Z) [default=N] ?/etc/sysctl.conf이 업데이트되어 나오는 메시지입니다.D를 입력하여 변경사항을 확인한 뒤 Y/N 중 하나를 입력합니다.
*** sysctl.conf (Y/I/N/O/D/Z) [default=N] ? d
--- /etc/sysctl.conf    2020-06-14 22:52:44.617580235 +0900
+++ /etc/sysctl.conf.dpkg-new   2020-02-14 07:44:31.000000000 +0900
@@ -25,7 +25,7 @@
 #net.ipv4.tcp_syncookies=1

 # Uncomment the next line to enable packet forwarding for IPv4
-net.ipv4.ip_forward=1
+#net.ipv4.ip_forward=1

 # Uncomment the next line to enable packet forwarding for IPv6
 #  Enabling this option disables Stateless Address Autoconfiguration
@@ -61,17 +61,8 @@

 ###################################################################
 # Magic system request Key
-# 0=disable, 1=enable all
-# Debian kernels have this set to 0 (disable the key)
-# See https://www.kernel.org/doc/Documentation/sysrq.txt
+# 0=disable, 1=enable all, >1 bitmask of sysrq functions
+# See https://www.kernel.org/doc/html/latest/admin-guide/sysrq.html
 # for what other values do
-#kernel.sysrq=1
+#kernel.sysrq=438

-###################################################################
-# Protected links
-#
-# Protects against creating or following links under certain conditions
-# Debian kernels have both set to 1 (restricted)
-# See https://www.kernel.org/doc/Documentation/sysctl/fs.txt
-#fs.protected_hardlinks=0
-#fs.protected_symlinks=0

Configuration file '/etc/sysctl.conf'
 ==> Modified (by you or by a script) since installation.
 ==> Package distributor has shipped an updated version.
   What would you like to do about it ?  Your options are:
    Y or I  : install the package maintainer's version
    N or O  : keep your currently-installed version
      D     : show the differences between the versions
      Z     : start a shell to examine the situation
 The default action is to keep your current version.
*** sysctl.conf (Y/I/N/O/D/Z) [default=N] ? nn을 입력하여 기존 파일의 내용을 유지하였습니다.
(IPv4 패킷 포워딩이 설정되었음)
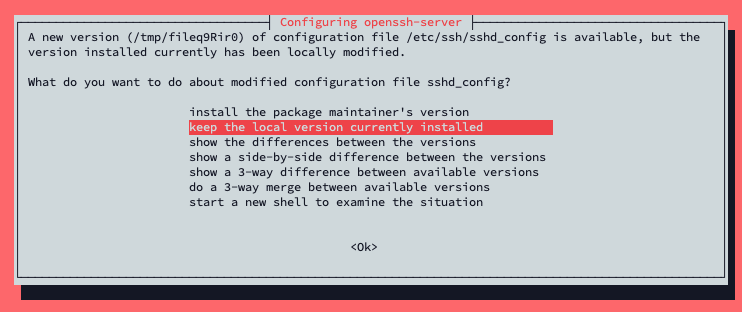
기존의 openssh-server 설정 파일을 유지하였습니다.
.......

Reading package lists... Done
Building dependency tree
Reading state information... Done

Searching for obsolete software
Reading state information... Done

Remove obsolete packages?

86 packages are going to be removed.

 Continue [yN]  Details [d]
사용하지 않는 패키지를 삭제할지 묻는 메시지입니다.y를 입력하여 삭제합니다.
System upgrade is complete.

Restart required

To finish the upgrade, a restart is required.
If you select 'y' the system will be restarted.

Continue [yN]
업그레이드 완료 메시지입니다.y를 입력하여 재부팅합니다.
$ lsb_release -a
No LSB modules are available.
Distributor ID: Ubuntu
Description:    Ubuntu 20.04.1 LTS
Release:        20.04
Codename:       focal
업그레이드가 완료된 것을 확인할 수 있습니다.
(필요한 경우) 서드파티 저장소 활성화
위 과정에서 비활성화된 서드파티 저장소를 활성화합니다.
/etc/apt/sources.list.d/ 내부에 있는 *.list 파일의 내용을 확인하여
# ....... focal main # disabled on upgrade to focal의 주석을 해제합니다.
패키지 목록을 다시 받아옵니다.
$ sudo apt update